Back to Blog Home
6 step guide to automating client onboarding for agencies

[Hide]
Run your agency with Copilot
Copilot gives you the tools you need to start, run, and grow your client business. Try it for free!
4.9 rating
There’s no better feeling than signing your first client.
But that feeling usually comes with a side of anxiety too.
“What if I mess this up?”
“What if I come across as an imposter?”
Totally valid. I’ve been there. I had those exact thoughts when I signed my first marketing client over three years ago.
The truth is, doing great work is only part of the job. The other part, the one nobody really talks about, is how you bring clients into your business. Because the way you handle onboarding sets the tone for everything that follows.
In this guide, I’m going to walk you through how to build a smooth, professional client onboarding experience using the exact process I’ve refined while running my agency. It’ll help you look polished, stay organized, and actually make your clients excited to work with you.
Let’s get into it!
What is the agency client onboarding process?
The agency client onboarding process is a series of steps you take when you’re bringing a new client into your business and setting up the foundation for the work you’re about to do together.
It includes everything from sending over a welcome message, collecting key info, signing contracts, and setting up billing. But the best onboarding experiences actually start before the client kicks off. It’s all in how you prep.
Do you have a repeatable system that reduces busy work?
Do you have forms ready to go?
Do clients know exactly what to expect from the start?
The better you plan, the better the first impression will be. And that impression can be the difference between a one-off project and a long-term client.
In the next section, I’ll break down exactly how to set up an easily repeatable onboarding process using tools like client portals, automations, and templates, so everything feels smooth and scalable from day one.
6 steps to the marketing agency client onboarding process
Here’s a six-step process to automate your client onboarding:
- Automate with client portal software
- Create an automated welcome message
- Set up intake forms based on triggers
- Invite your client to their dedicated portal
- Get your contracts e-signed
- Set up payments or subscriptions
Let’s go over each of these.
1. Automate with client portal software
The first step to any modern marketing agency onboarding process is to use software and tools to help you build a remarkable client experience.
I'm going to admit, building a successful service business is hard. It's a lot more than just mastering a skill and being able to sell that skill to businesses. When you start a marketing agency, you are really going into the business of relationships.
The way I've personally kept clients for years at a time, outside of just driving performance results, has come from creating a human connection with my clients. And it's why I always recommend every marketing agency first focus on their client experience.
Outside of just finding clients and going through the whole prospecting process and actually getting somebody to say yes to you, the experience somebody has with your services starts with the onboarding process.
When I first started my marketing agency, I built my website using Webflow. And I knew I wanted some sort of dashboard or portal that my clients could sign into. This way, my service business would feel more like a self-serve software business (like a SaaS).
I went as far as custom developing a portal for the back end of my marketing website. But through this process, I came across Copilot — a client portal tool designed specifically for agencies and firms.
And yes, I know what you're thinking: this article is on the Copilot blog. But I am actually not an employee at the company. I've been using Copilot for my own marketing agency for the past two and a half years, and they asked me to write this article because of my actual experience.
Sure, you could use a project management tool onboard a client. But the thing I like about Copilot is that it puts your entire agency tech stack under one roof. There are a bunch of automation features, it has built-in billing and subscriptions, it has built-in e-signatures for contracts, I can message my clients inside the portal, and I can easily integrate it with my Webflow website.
There's a free trial that you can check out without adding your credit card. And you can even check out this interactive demo below:
Once you’ve found a client portal tool and set it up, the next step is to prepare it for a smooth and repeatable onboarding process. Once a client logs in or signs up to their portal for the first time, the first thing that they should see is a welcome message. Let's get into that.
2. Create an automated welcome message
Alright, your client just signed in for the first time. This is your moment to make a strong first impression.
One of the most underrated parts of the onboarding process is the welcome message. It sounds simple, but it sets the tone for the entire relationship. Instead of leaving your client wondering what to do next, you can use this message to give them direction, clarity, and confidence in your process.
Inside Copilot, you can set this up using the Messages App, which lets you send both custom and automated messages to clients. I use it to create a personalized welcome message that goes out the second a new client account is created.
You can personalize the contents of the message however you want and even link directly to next steps, like filling out an intake form, signing a contract, or watching a Loom video walking them through the portal.
If you want a walkthrough on how to set this up, here's a guide on how the Copilot Messages App works.
The point is not to leave your client guessing. Make it clear what happens next. A quick message goes a long way in making your agency feel organized and professional.
Once that welcome message is ready, it’s time to build the actual onboarding flow, starting with your intake form.
3. Set up intake forms based on triggers
Once your welcome message is ready, the next step is to collect the info you need from your client to get started.
This is where intake forms come in. If you’re new to the concept, a client intake form is basically a form you send to your client to collect all the important details about their business, goals, preferences, and anything else you need to do your job well.
This could also be the place where you ask for access to things like Google Analytics, social media account login information, ad accounts, CMS access, or really anything you need to deliver on your marketing services.
In the past, I’ve seen agencies ask these questions over email, on a kickoff call, or through a Google Doc. That works if you’re just starting out, but it’s not scalable. When you’re working with multiple clients at once, the back and forth gets messy (speaking from personal experience).
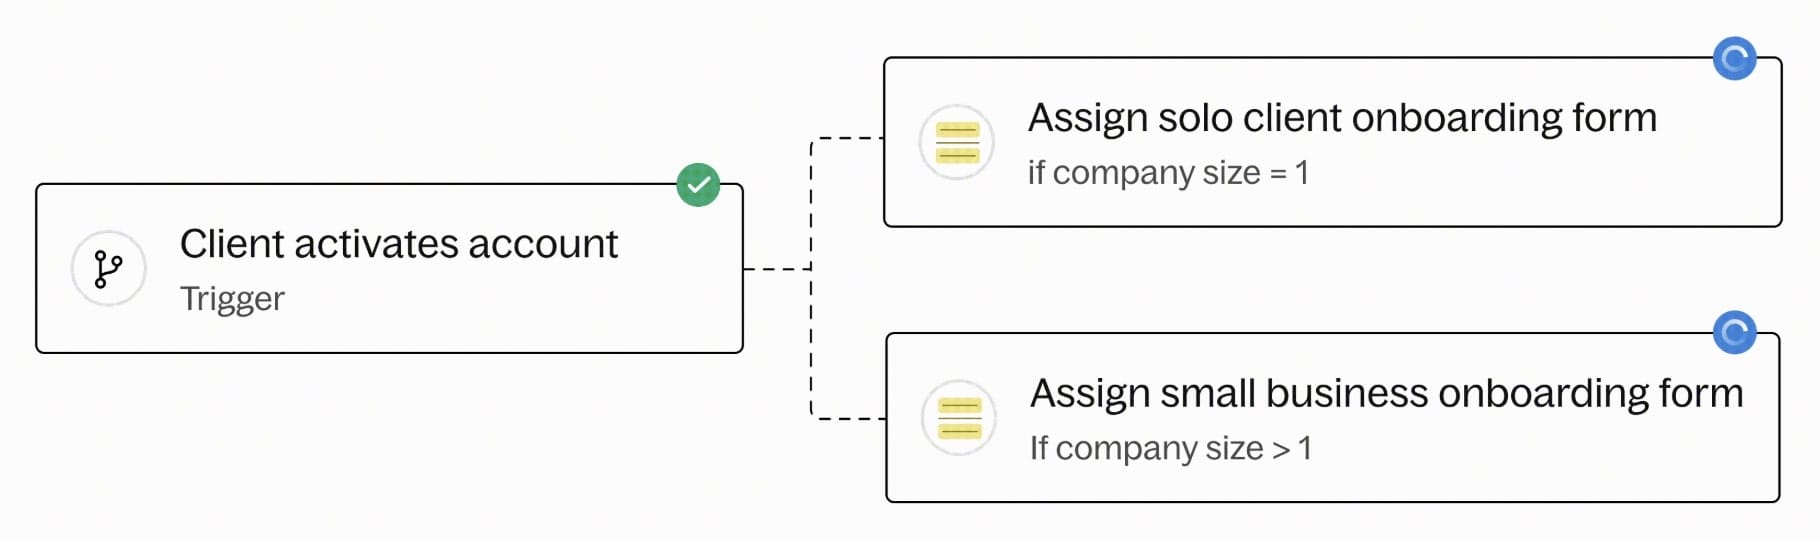
Inside Copilot, you can create custom intake forms that live directly inside your client portal. And even better, you can connect those forms to automation triggers that fire when the form is submitted. For example, once your client fills out the form, you can automatically send a thank you message, notify your team, or assign them to a specific segment inside the platform.
If you want ideas for what to include, we put together a list of intake form examples across different industries. You can take inspiration from those and tweak the questions to fit your agency’s services.
The goal here isn’t to overwhelm your client with a 50-question form. Keep it focused. Ask for just enough to get started with clarity, and save the deeper stuff for later once the relationship builds.
Once your intake form is live and connected to the right triggers, the next step is to invite your client into the portal and kick everything off.
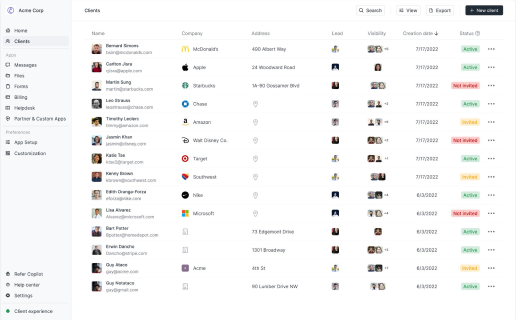
4. Invite your client to their dedicated portal
Now that your intake form is set up and ready to go, it’s time to invite your client into their portal.
There are two main ways to do this inside Copilot. You can either manually create a client profile, or you can send your client a sign-up link so they can create their own account.
Personally, I recommend starting with the manual route, especially if you're still fine-tuning your onboarding flow. It gives you more control and helps you catch any small issues before automating the experience. Once you've gone through the process a few times and everything feels smooth, then you can switch to letting clients sign up on their own.
If you want a full walkthrough on how to manually add a client, check out this guide or this video tutorial. You can also play around with the client creation flow using this interactive demo to see exactly how it works:
Once your client is added, Copilot will automatically send them an invite email. When they log in, they’ll see the welcome message you created earlier, along with the intake form you want them to fill out.
At this point, everything is starting to come together. The portal is live, your client has access, and you’re ready to move into the next step, getting your contract signed.
5. Get your contracts e-signed
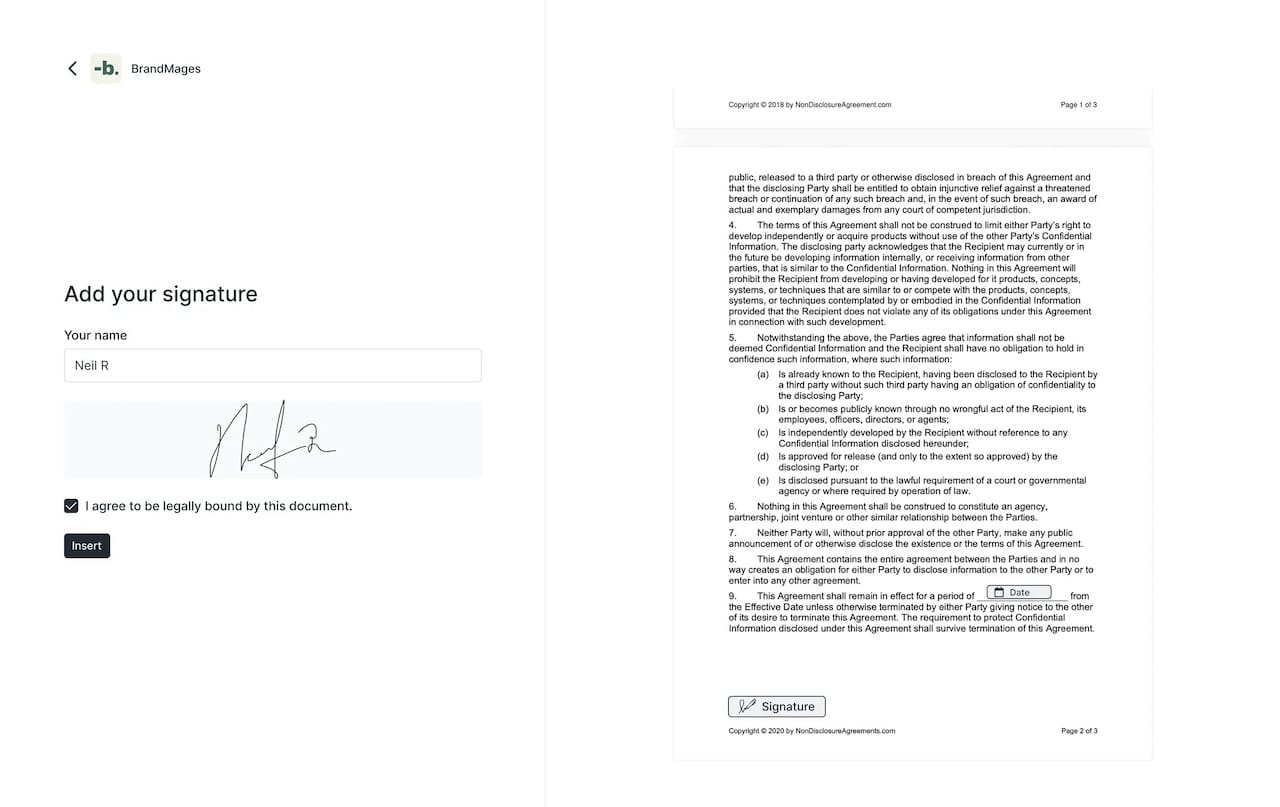
Once your client is in the portal and has filled out their intake form, it’s time to make things official.
Copilot makes this part really easy. You can upload your contract directly into the Contracts App and send it out for e-signature without ever leaving the platform. Your client gets a notification, opens the contract, and signs it digitally. You both get a copy, and everything is saved securely in the portal.
You don’t need to use a third-party tool or send PDFs through email. It all happens in one place. This is also where the Files App comes in handy, since all your signed documents are automatically stored and organized for future reference.
I like to have the contract ready to go as soon as the client logs in, so it’s one of the first things they see after the intake form. It keeps the momentum going and avoids delays that can happen when you wait too long to get things signed.
Once your contract is signed and saved, you’re officially in business. Next up is the final step, getting paid.
6. Set up payments or subscriptions
The final piece of onboarding is getting your payment system in place. Whether you’re charging a flat monthly retainer, doing project-based work, or using a hybrid model, you want billing to feel easy and seamless for both you and your client.
Inside Copilot, you can use the Billing App to create one-time invoices or set up recurring subscriptions. Your client gets notified, they pay directly in the portal, and you get paid without needing to follow up.
If you’re still figuring out your pricing structure, I wrote a full breakdown of agency pricing models to help you decide what makes the most sense for your services. And once you have that dialed in, here’s a guide on the best way to invoice clients, along with a list of invoicing tools built specifically for marketing agencies if you want to explore more options.
I personally like keeping everything under one roof. Copilot’s invoicing system lets me send branded invoices, accept credit card or ACH payments, and track the status of every transaction without needing another tool. And it’s all integrated with Stripe, so you know it’s secure and scalable.

Even though billing isn’t technically part of onboarding, it’s something I always set up right after the contract is signed. It’s the final step to getting started and helps you avoid awkward payment delays down the line.
Once your client is onboarded, contract signed, and billing set up, everything else is just delivering on what you promised.
Modern marketing agencies run on Copilot
If you made it this far, congrats. You’re far ahead than most agency owners. And you know that onboarding isn’t just some boring backend process to glance over. It’s the first real experience your client has with your agency..
The marketing agencies that grow fast and keep clients for the long run are the ones that get serious about their systems. They don’t run ads, write blog posts, or create videos to publish on TikTok. They make the entire client experience feel smooth, organized, and human from day one.
That’s exactly what Copilot helps you do. From intake forms and welcome messages to contracts, payments, and more, Copilot gives you everything you need to build a repeatable onboarding system that feels like an extension of your brand.
And because so many marketing agencies use Copilot, you don’t have to start from scratch. Check out this marketing agency template to see how you can plug and play a pre-built onboarding setup that’s designed for agencies like yours.
If you read this article, I know you care about your business and clients. Now it’s time to make the client experience match it.
Share this post
Sign up for our newsletter
Subscribe to our newsletter to receive emails about important announcements, product updates, and guides relevant to your industry.
